|
This is really helpful information if you love pantographs for marking your quilting design. You can print them at home and use your domestic machine or your sit-down quilting machine. Everything you need to know is in the video. PS - the Pencils recommended in the video are well worth buying. I found they marked on both dark and light fabrics. One marking pencil for almost everything, and it easily comes out with water. If you can't find them locally, I bought them on Amazon. Thank you to SewVeryEasy for another helpful video. Link to her video on quilting from the back: Click Here The website mentioned in the video with free patterns Click Here
0 Comments
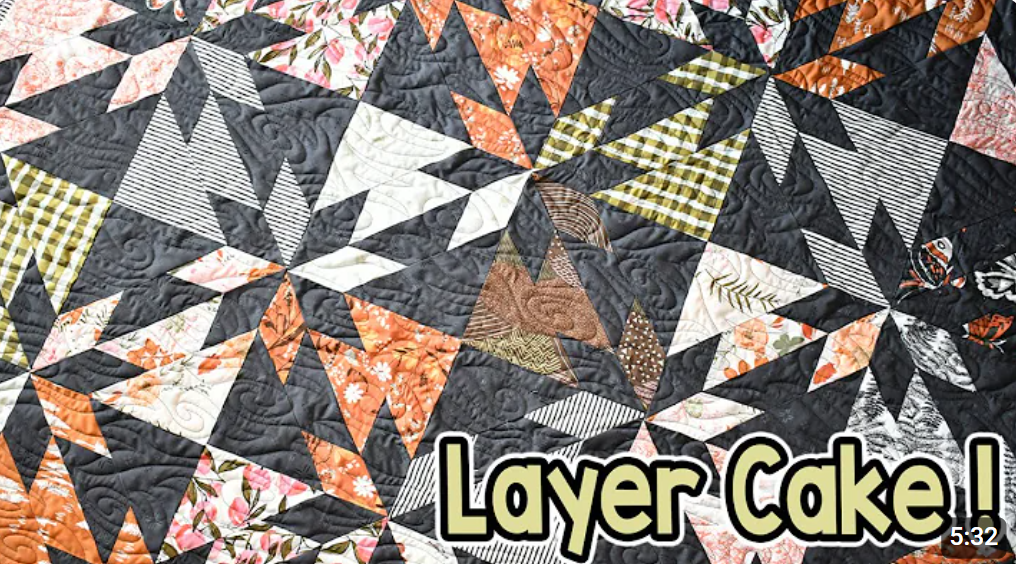
What is that??? Do you remember as kids playing the Telephone Game, also called the Whisper Game? Whisper something in the next persons ear, they repeat and whisper in the next, and so forth. At the end we get a laugh on how much it has changed! The Quilt version starts with a photo sent to the first person in the 4-member team. They make a small quilt top in any quilting style (12x12 is big enough) and submit a photo to us. That photo is sent to the next member of the team, and so forth. No one gets to see previous clues, Timeline: August, September, October, November. Reveal of all 4 quilts in early December. Details and signup in our "Member Login" section To Join Virtual Quilters if you haven't (membership is free) Click Here Here is a video of the Game done by another group: This video shows an easy way to make portable design Boards any size you want. Handy for laying out components for quilt blocks, organizing your paper piecing blocks, and stacking up your project to save running back and forth to the iron a few less times. Inexpensive, lightweight, and stackable! Of course, a big Thanks to Pride & Joy Quilting for sharing this info. Here are some interesting tips if you are frustrated with your seams not matching on projects. Sometimes it really matters, especially when the pieces you are sewing are small. A big thank you to our member, Tomi of California, for letting us know about this video. Understanding the best way to use your sewing machine is pure gold. Here is an good video with tips on the best way to wind your bobbins. It could save you a lot of hassle! This video is really helpful and helpful in making Strip Sets for some quilt patterns. Check it out. I thought this was an excellent video for someone who wants to try Walking Foot Quilting. It is a free video on You Tube by Southern Sewing Co. I find this type of quilting is faster and easier to do and is perfect for donation or gift quilts. I happen to use the design she calls "waves" also known as "gentle curves." It is relaxing to do and has looked really nice each time I have used it. Here are some time stamps if you want to go straight to the topic you are interested in: Time Stamps: 0:00 Introduction 1:14 How to Install a Walking Foot 2:48 How to Start/Stop Quilting 5:31 Stitch Length 6:25 Walking Foot Quilting Designs 6:55 Stitching in the Ditch 8:44 Straight-Line Quilting 11:59 Waves 13:54 Cross Quilting 15:22 Diagonals 16:48 How I Quilted My Quilt 17:25 Tips for Quilting Bigger Quilts
Notes from Lori: For the ones I made I just used:
Then just follow whatever style of pouch, wallet, bag, etc you want to make with your newly created slab of fabric. These links are from Canadian Amazon but this is the tulle and fusible I bought. Use the phrase below to search Amazon:
Lori
This was posted as a comment by someone. I thought it was a very useful tip and wanted to share it here. The blue line is her marking on the fabric of the "path" for her to follow as a general guide. The red is her quilting/stippling. By having the path determined ahead of time, it helps you know your way and not get stuck in a corner. With one less thing to think about, it can be much easier to do and it looks better too. Give it a try!  I can think of lots of uses for these tiny scrappy stars. It would be fun to figure them out in other sizes too. Just keep making them! Instructions included with the video:
Let’s make scrappy little 4” stars. You’ll need these patches:
The pattern download mentioned a video that was perfect for making multiple flying geese. It was still available and it is a very interesting way to make them. An old Fons & Porter video, of course. Below is the video, and well worth watching. A thank you to our member, Mary Ann, for recommending this video. It shows an easy tip for reducing the bulk on the mitered corners on binding, as well as some tips for hand stitching.
One of our members, Pam, let us know about this new trend. Using washable school glue is easy, nontoxic, and doesn't gum up your machine if you follow the procedure shown. By the way, Pam's sister tried this technique and loved the results. The first video below gives a quick overview of the process. She refers to the original video she watched, and so I have posted those 2 videos below. I highly recommend watching the original videos if you want to use this technique. Well worth the time. PS- This is Ann. I tried this method and love it! I am changing to doing this with all my projects. Below is the original with more details on this technique: Answering all the questions that her followers asked about. A lot of useful information in this video. Enjoy! This is such a nice gift for quilters. Irene from Sugaridoo.com has written an eBook with 101 designs to choose from, and it is free! Check it out and follow her 5 steps in her video. Here is a link to her website to download her free ebook: https://sugaridoo.com/101-ideas-for-straight-line-quilting/ Scroll down and signup to receive the ebook by email. You can opt in if you want to receive emails from her, but not required.
This may be hard to hear, but it is true that people don't always realize the cost of materials and your labor in making your quilts. This video details the costs for a Queen size quilt, and the total surprised me. If you are curious, you might want to watch this video on You Tube. Click Here 
|
Virtual QuiltersWe welcome quilters from any area to join our free virtual quilt group. If you have questions, contact [email protected] Archives
July 2024
|
||||||||||||||||||||

 RSS Feed
